
Liposuction Recovery at Home: Week-by-Week Timeline, Care Tips, and Warning Signs
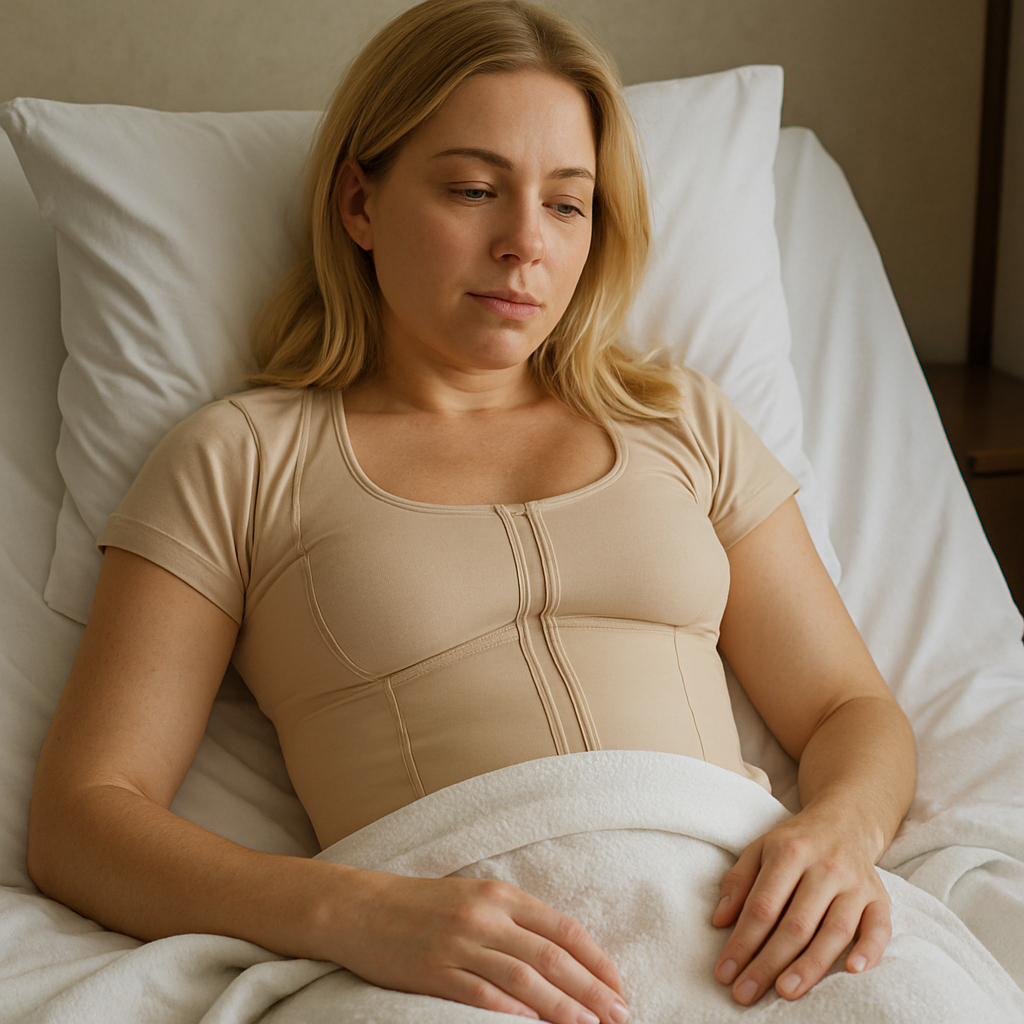
Key Takeaways
- Liposuction Recovery at Home Follow a clear healing timeline and recovery plan to reach final results safely and on schedule. Check with your surgeon about factors that may alter your timeline.
- Manage symptoms with compression garments, cold packs, medication, and a daily symptom log to catch problems early.
- Wear compression garments around the clock as recommended. Keep them clean and snug. Set reminders to maintain compliance and replace them if elasticity fades.
- Bolster recovery with a protein-rich, anti-inflammatory diet, regular hydration, and restricted salt and processed foods for less swelling and better tissue repair.
- Reintroduce activity gradually starting with short walks and gentle stretching. Avoid strenuous exercise until you’re cleared. Prioritize sleep and elevation to reduce swelling.
- Be on the lookout for complication symptoms like increasing pain, fever, increased drainage, or calf swelling. Reach out to your care team right away if these arise.
Liposuction recovery at home is the time post-surgery when patients heal at home, not in an institutional setting. This involves rest, wound care, compression garment utilization, controlled ambulation, and timely follow-ups with the surgical team. Recovery timelines extend over days to weeks, with swelling and bruising subsiding during this period and most patients resuming normal activities by six weeks. What follows are practical measures, safety checks, and timeline expectations.
Healing Timeline
While there’s a fairly standard healing timeline after liposuction, the timing is different for everyone and depends on the size of the procedure. Here’s a straightforward timeline of what to expect, why it’s important, and what you can do to help your body heal and results emerge.
1. Days 1–3
Get plenty of rest and keep the treated areas elevated as much as possible to minimize swelling and discomfort. Swelling typically reaches its height during the first few days. Anticipate moderate discomfort and bruising. Wear compression garments and change dressings immediately as your surgeon directs to reduce infection and promote shaping. Take your pain meds on schedule instead of when you’re in really bad pain. This keeps you comfortable and helps you move enough to minimize clot risk. Monitor incision sites for uncontrollable swelling, abnormal drainage, spreading redness, or fever. Notify your surgeon immediately about these symptoms.
2. Week 1
The first week is critical. Most patients see marked swelling and bruising and must avoid strain. Wear your compression garments 24/7 unless otherwise instructed. Take light, brief walks inside to get circulation going and reduce blood clot risk, but steer clear of extended hikes or stairs-laden journeys. Restrict activities each day. Avoid lifting, bending, or strenuous housework. Each day, check incisions for warmth, spreading redness, or foul-smelling drainage. These can be signs of infection and require medical evaluation. Most are back to light desk work at about two weeks, but schedule downtime for the first week.
3. Weeks 2–4
Start light activity as you feel able. Slow walks and gentle stretching assist lymphatic circulation. Swelling and bruising should subside significantly by week two, but slight puffiness may remain through week four. Keep on compression during the day to help shrink and contour the skin. Anticipate a few hard ‘lumps’ beneath the skin. These are normal and typically loosen over weeks to months with massage if recommended. No heavy lifting or high-impact exercise until your surgeon clears you, usually in about four weeks for most patients.
4. Weeks 5–8
You can reintroduce moderate activities and low-impact exercise routines, such as cycling or swimming, following clearance. Evaluate scar healing and skin retraction. Scars will look pink or raised but will fade over time. Monitor any residual swelling or nodules and report persistent problems. Adjust compression use based on recovery. Some need it less, while others benefit longer per surgeon guidance.
5. Months 3–6
Final body contours emerge gradually. Most notice significant improvement in three months and complete resolution by six months. Return to all exercise, including weights and intense workouts, when given the green light, typically four to six weeks but it may vary. Apply topical scar treatments and/or massage to assist scar fade. Maintain weight to keep results.
Symptom Control
Following liposuction, anticipate a combination of swelling, bruising, fluid leakage, itching, and soreness. About: Symptom control. Use preplanned actions to minimize symptoms, accelerate healing, and identify complications early. Record day-to-day progress in a log that details pain level, drainage, swelling, bruising, temperature, and ability to move. Show that log to your surgical team if anything appears abnormal.
Swelling Management
Wear your customized compression garment as recommended – most surgeons suggest 4 to 8 weeks. It controls swelling, provides tissue support and helps skin conform to new contours. Symptom control is important. Elevate treated areas when reclining and prop legs on pillows post lower-body liposuction to encourage fluid to travel away from the area. Reduce salt in meals because sodium can exacerbate fluid retention and prolong swelling. Short, gentle walks multiple times a day encourage lymph flow without stressing your incisions. Swelling can linger for weeks and even months. Most patients report a distinct turn for the better by week three when the worst of the swelling begins to subside.
Bruise Reduction
Cold compresses during the first 48 hours restrict early blood pooling and minimize bruising. After that window, transition to warm compresses as recommended to help clear old blood and reduce stiffness. Consume vitamin K-rich foods, such as spinach or kale, to aid in normal clotting and bruise resolution. Stay away from aspirin, some anti-inflammatories, and blood thinners unless your care team approves. Bruising typically peaks between weeks 1 and 3 and generally dissipates within two to three weeks. Record color changes and spreading in your symptom diary and inform us of rapidly worsening or painful areas.
Fluid Drainage
Anticipate some incision site drainage for 24 to 72 hours, which is frequently serosanguineous or pink-tinged. In the case of temporary drains, adhere precisely to directions regarding emptying and quantifying output. Note volumes in your log. For about a month, keep incisions clean and dry. Follow your team’s preferred wound-care method to avoid infection and fluid collection. Light massage or professional lymphatic drainage can help shift trapped fluid and minimize fibrosis, but only begin when your surgeon has given the OK. Watch for seroma signs: a soft, persistent swelling or a fluctuant pocket under the skin. If you observe these, escalating compression and timely provider contact can stave off complications.
Garment Care
Compression garments aid healing, minimize swelling, and shield treated areas post-liposuction. Follow your surgeon’s instructions to the letter. Garment care includes how to check fit, set a wear routine, and keep garments and incision sites clean to reduce infection risk and help your body settle into its new contours.
Fit Check
Make sure garments cover all your treated areas, as gaps leave your skin unshielded and can decrease efficacy. Tighten straps, ties, or closures so that pressure remains constant throughout the area. Extra tightness in one space bunches skin and reduces efficacy in another. Be on the lookout for skin irritation, redness, or deep indentations where seams or edges compress, as these can indicate excessive local pressure or an improper size. Test circulation by observing color and warmth of the skin distal to the garment. Numbness or persistent cold indicates loosening and calling your clinic. Use a short checklist each morning and evening: coverage, even pressure, no pinching, no unusual marks, and normal sensation. Keep photos or notes for your surgeon if you observe change.
Wear Routine
Set alarms or phone reminders to keep wear times consistent, particularly in the first 72 hours when swelling is at its worst. Most patients wear the compression garments close to 24/7 for 3 to 4 weeks. Some regions, such as calves or ankles, may utilize support hose for up to 6 weeks. Take clothes off only momentarily to shower or wash clothes, and heed recommendations on when to take a shower. Generally, showering is permitted 24 to 48 hours post-op, but full baths should be avoided for approximately 2 weeks. Wean off wear according to your surgeon’s schedule. Do not discontinue abruptly without approval. Maintain a basic log of hours worn per day. This facilitates compliance and provides valuable information if healing plateaus.
Hygiene Habits
During garment changes, clean incision sites with mild soap and water to maintain a dry surgical site and reduce the risk of infection. Dab dry—don’t rub—before dressing to prevent locking in moisture that fuels irritation. Avoid lotions or creams around incisions unless your surgeon specifically approves them because certain products can inhibit healing or harbor bacteria. Garments should be washed in a hypoallergenic detergent, rinsed well, and air-dried to prolong elasticity and minimize skin irritation. Alternate between two sets if you can, so one can dry thoroughly and stay in shape while you use the other. Check garments frequently for stretched-out elastics or misshaping and replace your garments once they no longer offer snug, uniform support.
Home Nutrition
Good nutrition at home aids tissue repair, minimizes risks of complications, and keeps your energy up through liposuction recovery. Concentrate on a whole foods diet that provides lean protein, vitamins, minerals, fiber, complex carbs, and good fats. Stick to easy plate rhythms to minimize bloating, avoid constipation, and maintain mobility during recovery.
Protein Intake
Add lean proteins like chicken, fish, eggs, Greek yogurt, and legumes to each meal. Little, protein-rich snacks such as hard-boiled eggs, a cup of Greek yogurt with berries, or a hummus and veggie plate keep amino acids available for tissue repair and stave off hunger between meals.
Monitor your consumption with a food diary or nutrition app. Record portion sizes and meal timing to verify that you’re checking the day with your protein. Make sure you have it with every meal, not just in one big gulp. High-protein meal ideas include grilled salmon with quinoa and steamed greens, a chicken and brown rice bowl with avocado, and lentil stew with mixed vegetables. These unite protein with fiber and complex carbs to stabilize blood sugar and energy.
Anti-Inflammatory Foods
Incorporate berries, leafy greens, nuts and fatty fish like salmon or mackerel to routine shopping lists to inject natural anti-inflammatory properties into meals. Add turmeric and ginger to stews, smoothies, or dressings for mild inflammation regulation. Dust roasted vegetables with ground turmeric or blend fresh ginger into a fruit smoothie.
Exchange white grains for whole grains like oatmeal, brown rice, and quinoa to help lower post-meal inflammation and sustain you throughout the day. Plan weekly menus around anti-inflammatory recipes: spinach and berry salad with walnuts, turmeric-lentil soup, or grilled fish with a side of quinoa and roasted Brussels sprouts. They provide healing vitamins and minerals.
Fluid Balance
Hydrate by sipping water throughout the day and drinking a minimum of eight glasses, which helps maintain tissue fluid balance. Avoid caffeinated and sugary beverages that can boost dehydration risk and add empty calories. Opt for water, herbal tea, or diluted fruit-infused water instead.
Keep track of urine color as an easy hydration check. Pale straw color means you’re usually good. Prepare a daily hydration chart. Adequate hydration balances fiber and scheduled meals to help prevent constipation, a common post-operative side effect. Try to have some meals that are a mix of liquids and fiber-rich foods, such as oatmeal with fruit, soup-type lunches, and super-hydrated salads.
Safe Activity
Safe activity following liposuction promotes healing, reduces the potential for complications, and controls swelling. Your initial weeks are centered around light activity and rest. As your incisions heal and with your surgeon’s approval, activity increases gradually based on your pain tolerance. Here are some actionable guidelines, divided into distinct sections to assist in organizing day-to-day life.
Early Ambulation
Take short, slow walks within the first few days after surgery to stimulate circulation and decrease clot risk. Begin with very short walks in your apartment, then increase daily by walking just a little more than the previous day. Don’t try to walk fast. Do not stand or sit in a single position for extended periods of time. Shift weight, change posture, and take 5-minute walk breaks every hour if you can.
You might be prescribed support hose or compression wraps to avoid blood clots and reduce leg swelling. Wear them as directed and don’t omit wearing them when up and about. Increase walking distance as tolerated and quit if you feel sharp pain, dizziness, or excessive shortness of breath. While the majority of individuals return to light work within a few days, manual labor necessitates additional time off.

Gentle Stretches
Beside stretching, nothing bar some simple arms, legs, and back stretches just to keep the joints moving and prevent stiffness. No stretch should pull directly on incision sites or treated areas — stretch regions away from wounds. Safe activity.
Hold each stretch for 10 to 15 seconds without bouncing or straining through the movement, and breathe slowly during the hold.
Incorporate light stretching activities twice a day during the initial weeks to keep yourself flexible and aid circulation. Incorporate simple exercises such as shoulder rolls, ankle pumps, and seated hamstring stretches. If swelling or tenderness becomes worse after a session, scale back the intensity or duration of your routine. Light exercise may generally resume after four weeks or so, but do not return to vigorous or heavy workouts until cleared by your surgeon.
Rest Patterns
Get 7 to 9 hours of sleep a night so your tissues can repair. Taking it easy and plenty of rest in the first few weeks helps the body heal. Lie down with your upper body and legs elevated on pillows to help reduce swelling. Switching back and forth will help prevent stiffness. Brief daytime naps curtail fatigue in that initial week, yet avoid extended daytime sleep that interferes with nighttime rest.
Create a soothing bedtime ritual—dim lights, minimal screen time and light reading—to nip this in the bud. No baths for 2 weeks or until your doctor gives you the okay. Showers may be permitted 24 to 48 hours post-op if cleared. You should avoid heavy lifting, bending or strenuous activity for a few weeks in order to protect your incisions and help prevent bleeding or fluid accumulation.
Complication Signs
Liposuction recovery at home includes familiar, anticipated responses and a small checklist of complication signs that require swift action. Mild pain, swelling, bruising, and some clear or slightly blood-tinged drainage from incision sites are common over the first days and tend to peak within the first week. Swelling and bruising typically persist for a minimum of 10 to 14 days. Peak swelling generally appears early and declines gradually over weeks as the body adapts. Activity, such as light walking and brief activity, stimulates circulation and supports recovery, but keep an eye out for anything that exceeds the normal.
Severe pain, swelling, or redness that gets worse. Severe pain that does not subside with the prescribed meds or that escalates after a period of initial relief can be a harbinger. Normal pain dissipates by the end of the first week. If it is severe, stabbing, or persistent after that, reach out to your surgeon. Swelling that gets worse instead of slowly subsiding or redness that spreads away from the incision could indicate an infection or complication. Compare both sides of the treated area. For example, asymmetry with marked swelling on one side can be a concern. Make notes of pain level and photograph daily to show trends to your provider.
New surge drainage, pus, or foul smell coming from incision sites. Some fluid drainage is normal for a few days. Any rapid change, such as more drainage than previously, thick yellow or green pus, or a bad smell, implies infection and requires medical evaluation. Be on the lookout for dressings drenched through with blood in amounts larger than the initial post-operative period. Save and detail the drainage color, quantity, and timing when you call for advice. Light constant serous drainage is normal, while heavy or foul drainage is not.
Symptoms of blood clots like calf pain or ankle swelling. A clot in a deep vein manifests as new, localized calf pain, tenderness, warmth, or increased ankle swelling. These signs deserve immediate contact with your surgical team. Limited movement increases clot risk, so short walks a few times a day help reduce that risk. If they advance to shortness of breath or chest pain, access emergency care immediately and call 911!
Monitor temperature and note any fevers or chills as possible infection signs. There may be a low-grade temperature, but a fever of over 38°C (100.4°F) or recurrent chills points to infection. Record when fever began and associated symptoms such as increasing pain or drainage. Reporting early means it is easier to get timely antibiotics or further care.
Conclusion
Liposuction recovery at home can be bogged down and sluggish, yet easy steps make an obvious impact. Adhere to the healing timeline, wear compression garments as pictured, and control pain and swelling with safe medications and cold compresses. Protein-packed meals, water, and skipping salt will help those fluids leave the body. Be active with brief walks and simple household tasks to decrease clot dangers and keep muscles active. Watch for fever, worsening pain, strange drainage, or breathing difficulty and call a provider ASAP. For consistent progress, record symptoms daily and adjust rest, nutrition, and activity according to how you feel. If uncertain, contact your surgeon or clinic for specific guidance.
Frequently Asked Questions
How long does liposuction recovery at home usually take?
Most require 1 to 2 weeks for basic recovery and 4 to 6 weeks before any noticeable swelling begins to subside. Complete healing and final results can take 3 to 6 months. Adhere to your surgeon’s recovery timeline for optimal results.
When can I shower after liposuction?
You are generally allowed a light shower 24 to 48 hours post-surgery if incisions are covered and sealed. Dab incisions dry and respect your surgeon’s dressing and bathing guidelines.
How should I control pain and swelling at home?
Administer your prescribed pain medication, apply cold compresses during the initial 48 to 72 hours, and ensure you wear your compression garment accordingly. Elevate treated areas whenever possible and remain well hydrated to assist in de-swelling.
How long should I wear a compression garment?
Wear your compression garment 24/7 for the initial 2 to 4 weeks, then during the day for an additional 4 weeks or as recommended by your surgeon. It is used consistently to help reduce swelling and contour results.
What foods help support healing after liposuction?
Consume protein, vegetables, fruits, whole grains, and healthy fats. Drink plenty of water and avoid salt, alcohol, and processed foods to minimize swelling and encourage tissue healing.
When can I resume exercise and normal activity?
Light walking is encouraged immediately to lower clot risk. Avoid vigorous activities and heavy lifting for 4 to 6 weeks or until your surgeon gives you the go-ahead. Ease into activity based on comfort.
What signs of complications should prompt immediate medical attention?
Seek immediate care for heavy bleeding, fever above 38°C, severe increasing pain, sudden swelling or shortness of breath. These may signal infection or a blood clot and need urgent evaluation.
 Directions
 Call Us
 Email Us